
准备工作
经过前面的课文学习,我们已经掌握了一些vue3的基础知识,接下来让我们试着完成一个简单的账本App。
因为样式部分比较简单,所以将直接从逻辑代码部分开始讲解。课文中会提供静态资源以及布局代码,也可以直接从课堂作业(付费)中下载项目压缩包(逻辑部分未实现)。
-
创建项目
-
下载静态资源
-
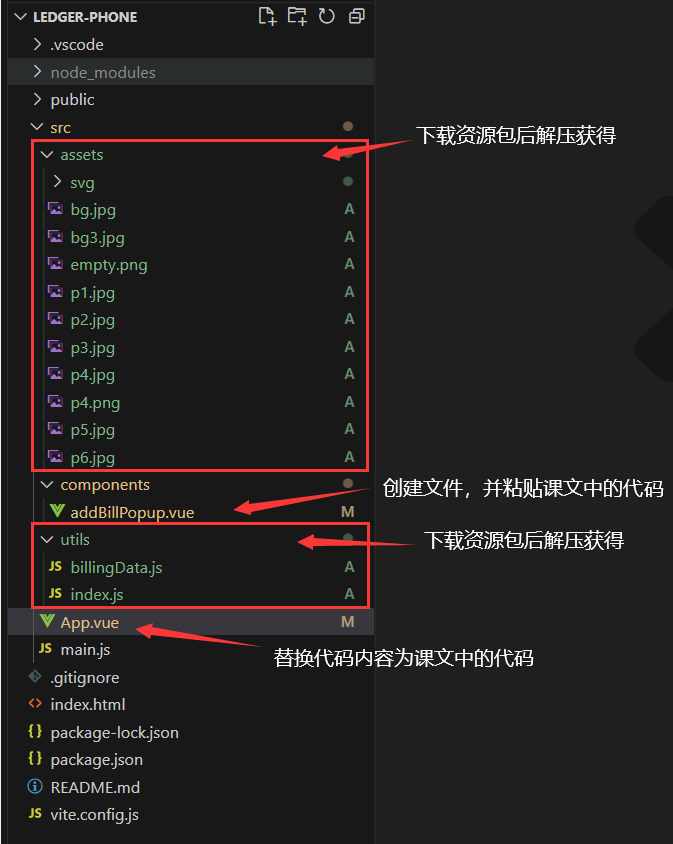
将下载的静态资源放到创建的项目src目录下
-
将App.vue的代码替换
-
在components目录下创建addBillPopup.vue,并复制代码进去
目录结构如下,只有src目录下的文件有改动
项目介绍🎞️
任务目标👀
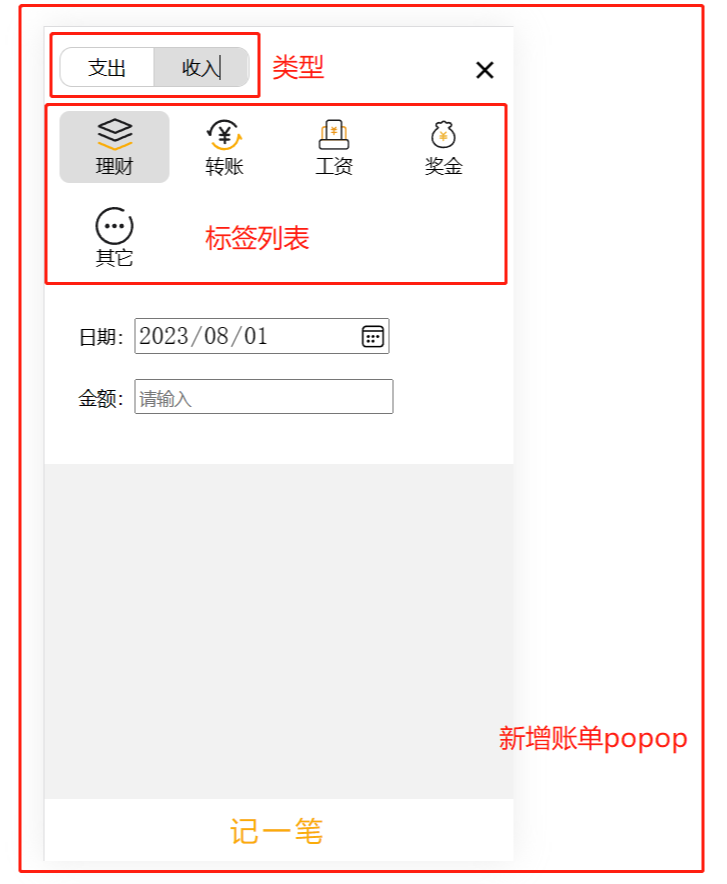
- 点击切换tab状态(支出/收入),并且根据当前选中的tab,渲染 出/src/utils/billingData.js下的标签,以及点击标签进行选中。
- 日期输入框默认值为"今天"。
- 点击右上角的"x"时关闭新增账单popup。
- 完成记一笔功能:在选择完类型、标签、日期、输入好金额后点击"记一笔"按钮时,将数据存到缓存(localStorage)中,"记一笔"之后关闭新增账单popup。
以上就是本节课中需要达成的目标,动手能力强的同学也可以尝试自己实现,实现方式可以不同,能达成目标就行。
视频🎞️
静态样式文件
App.vue
<script setup>
import billList from "/src/components/billList.vue";

</script>

<template>
  <!-- 顶部区域 -->
  <div class="header-box">
    <div class="header">
      <!-- bar -->
      <div class="header-top-bar">
        <!-- 左占位 -->
        <div></div>

        <!-- 当前日期 -->
        <div class="date">08-01</div>

        <!-- 添加账单入口 -->
        <div class="add-ledger">
          <img src="/src/assets/svg/add.svg" alt="" width="55" height="55" />
        </div>
      </div>

      <div class="statistical-container">
        <div>
          <div>月结余</div>
          <div class="balance">1</div>
        </div>

        <div>
          <span>月支出:0</span>
          <span>月收入:1</span>
        </div>
      </div>
    </div>
  </div>

  <!-- 预算卡片 -->
  <div class="progress-card">
    <div class="space-between">
      <span>本月预算</span>

      <!-- 编辑预算值入口 -->
      <img src="/src/assets/svg/more.svg" width="20" height="20" />
    </div>

    <!-- 进度条 -->
    <div class="progress-bar">
      <div class="progress-bar-active" :style="`width: ${100}%`"></div>
    </div>
  </div>

  <!-- 账单记录列表 -->
  <billList></billList>
</template>

<style scoped>
.header-box {
  height: 189px;
}

.header {
  width: 100%;
  background: url("/src/assets/bg3.jpg") center;
  background-size: cover;
  color: #ffffff;
  font-size: 20px;
  position: fixed;
  height: 189px;
  top: 0;
  left: 0;
  z-index: 2;
}

.header-top-bar {
  display: flex;
  justify-content: space-between;
  align-items: center;
  height: 55px;
}

.header-top-bar > div {
  flex: 1;
}

.date {
  text-align: center;
}

.add-ledger {
  height: 55px;
  text-align: right;
}

.statistical-container {
  padding: 16px 24px;
}

.balance {
  margin-bottom: 10px;
  font-size: 28px;
}

.statistical-container span {
  margin-right: 20px;
}

.progress-card {
  width: 92%;
  padding: 12px;
  margin: 16px auto;
  background: #ffffff;
  box-sizing: border-box;
  border-radius: 10px;
  font-size: 15px;
}

.space-between {
  display: flex;
  align-items: center;
  justify-content: space-between;
}

.progress-bar {
  width: 100%;
  height: 12px;
  background: #dddddd;
  border-radius: 15px;
  margin: 10px 0;
  overflow: hidden;
}

.progress-bar-active {
  height: 100%;
  background: #58a595;
  border-radius: 15px;
  transition: width 0.5s;
}
</style>
addBillPopup.vue
<script setup>
// ToDo
// 1. 点击切换tab类型(支出/收入),并且根据当前选中的tab,渲染
//    出/src/utils/iconData.js下的标签,以及点击标签进行选中。
// 2. 日期输入框默认值为"今天"。
// 3. 点击右上角的x时关闭popup。
// 4. 完成记一笔功能,并且将记录的数据存到缓存(localStorage)中,
//    记一笔之后关闭popup


</script>

<template>
  <div class="popup">
    <div class="popup-box">
      <div class="top-box">
        <!--  tab类型切换  -->
        <div class="left-btn">
          <div class="active">
            支出
          </div>

          <div>
            收入
          </div>
        </div>

        <!--  关闭按钮(不找图标了凑合下)  -->
        <div class="close">x</div>
      </div>

      <!--  账单tag列表  -->
      <div class="classification-box">
        <div class="classification-item active">
          <img src="/src/assets/svg/finance.svg" width="30" />
          <div>理财</div>
        </div>
      </div>

      <div class="input-box">
        <div>
          <span>日期:</span>
          <!--  账单日期输入框  -->
          <input type="date" />
        </div>

        <div>
          <span>金额:</span>
          <!--  记账金额输入框  -->
          <input type="number" placeholder="请输入" />
        </div>
      </div>

      <!--   提交按钮   -->
      <button class="submit-btn">记一笔</button>
    </div>
  </div>
</template>

<style scoped>
.popup {
  background: #f2f2f2;
  height: 95vh;
  z-index: 9;
  position: fixed;
  width: 100%;
  top: 0;
}

.popup-box {
  padding: 12px 12px 20px;
  box-sizing: border-box;
  background: white;
}

.close {
  font-size: 22px;
  line-height: 28px;
  width: 28px;
  height: 28px;
  text-align: center;
}

.top-box {
  display: flex;
  align-items: center;
  justify-content: space-between;
  margin: 0 0 15px;
}

.left-btn {
  width: 150px;
  border: 1px solid #cccccc;
  border-radius: 10px;
  overflow: hidden;
}

.left-btn > div:first-child {
  border-right: 1px solid #cccccc;
}

.left-btn > div {
  width: 49.5%;
  display: inline-block;
  text-align: center;
  height: 100%;
  padding: 5px 0;
}

.active {
  background: #dddddd;
}

.classification-box {
  display: flex;
  align-items: center;
  flex-wrap: wrap;
}

.classification-item {
  width: 25%;
  display: flex;
  flex-direction: column;
  align-items: center;
  justify-content: center;
  margin-bottom: 15px;
  padding: 4px 0;
  border-radius: 8px;
  transition: all 0.3s;
}

.input-box {
  width: 100%;
  padding: 0 15px;
  box-sizing: border-box;
  margin-top: 20px;
}

.input-box > div {
  white-space: nowrap;
  margin-bottom: 20px;
}

.input-box input {
  font-size: 20px;
  width: 200px;
}

input::-webkit-input-placeholder {
  font-size: 14px;
}

.submit-btn {
  width: 100%;
  height: 50px;
  position: fixed;
  bottom: 0;
  left: 0;
  background: white;
  border: none;
  font-size: 22px;
  letter-spacing: 4px;
  color: #faac08;
}
</style>