
本课堂包含四段教学视频。
1. 快速认识
1.1 特点与安装
nlohmann/json 是一个在 github 长期霸占 “JSON” 热搜版第1的C++JSON处理库。它的最大优点是与 C++ 标准库的容器数据(比如 std::map、std::vector)使用体验一致,并且搭配良好,比如,假设 strct T 能与JSON双向互换,则 std::vector<T> 自然能与JSON双向互换。
在 msys2 ucrt64 环境下,安装命令为:
pacman -S mingw-w64-ucrt-x86_64-nlohmann-json
如果为了更好地兼容旧 Windows 系统,你选择的是 mingw64 环境,则该库名称为:mingw-w64-x86_64-nlohmann-json。
1.2 数据战场
一个 C++ 程序为什么需要使用到 JSON 数据?那是因为,程序即战场,数据即士兵,不同的战场需要不同的士兵。下图描述了“数据战场”的概念。
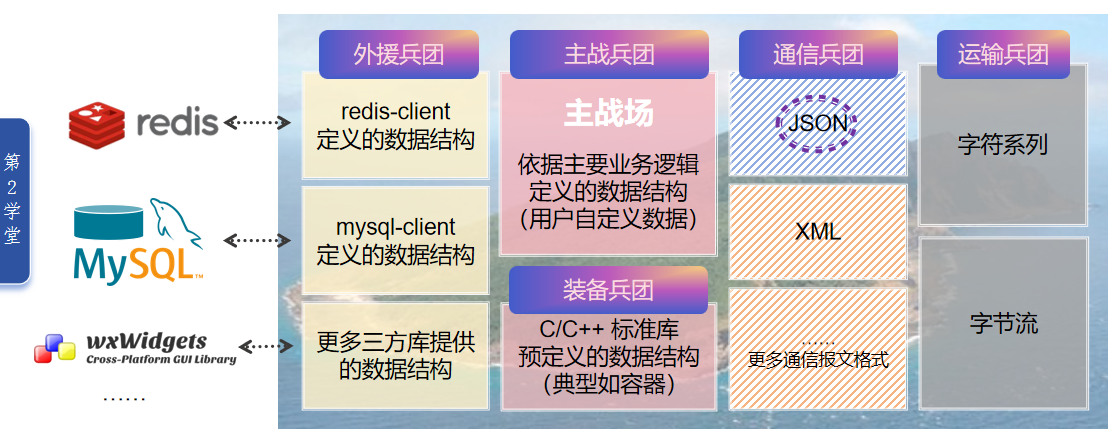
我们在 C++ 程序中自定义的数据,比如一个结构体,通常就是该程序中与业务最紧密结合,需要参与最多计算的数据,因此通常称为 “主战兵”;而JSON 数据常用作程序与外部环境的通信格式,因此被称为“通信兵”。nlohmann/json 是我们请来的 “雇佣兵”(三方库),它擅长以 C++ 结构模拟 JSON 语法,从而有效帮助我们的“主战兵”拥有变形金刚的能力……
在 “见证” 主战兵和通信兵如何快速互变之前,一定要先清楚二者之间存在一些重要差异:
- C++内置类型体系和JSON的类型体系并非一一对应
- JSON 不保证字段次序(如需要,可使用 nlohmann::ordered_json 类)
1.3 视频1:快速认识
1.4 Hello JSON
#include <cassert>

#include <iostream>
#include <string>
#include <vector>

#include <nlohmann/json.hpp>

using json = nlohmann::json;


/*
    {
    "id": "ORD20250409-191", //订单号
    "customerID": 10345, //用户ID
    "items": [123,94320,8], //商品货号列表
    "totalAmount": 172.8, //总价
    "orderDate": "2025/04/09" //下单日期
    }
*/

int main()
{
    json o1 =
    {
        {"id", "ORD20250409-191"},
        {"customerID", 10345},
        {"items", {123, 94320, 8}},
        {"totalAmount", 172.8},
        {"orderDate", "2025/04/09"}
    };

    std::cout << o1.dump(2) << std::endl;

    json oArray = {123, 94320, 8};
    std::cout << oArray.dump() << std::endl;

    json oInt = 123;
    json oString = "Tom";
    json oBoolean = true;

    std::cout << "int -> \t" << oInt.dump() << "\n";
    std::cout << "string -> \t" << oString.dump() << "\n";
    std::cout << "boolean -> \t" << oBoolean.dump() << "\n";

    using namespace nlohmann::literals;

    // 字符串常量 -> json 变量
    json o2 = R"(
    {
        "id": "ORD20250409-191",
        "customerID": 10345,
        "items": [123,94320,8],
        "totalAmount": 172.8,
        "orderDate": "2025/04/09"
    })"_json;

    assert(o1 == o2);

    std::cout << "\no2->\n" << o2.dump(2) << std::endl;

    // 支持注释
    std::string source = R"(
    {
        "id": "ORD20250409-191",  // 订单ID
        "customerID": 10345,    // 用户ID
        "items": [123,94320,8],  // 包含商品的货号
        "totalAmount": 172.8,
        "orderDate": "2025/04/09"
    })";

    json o3 = json::parse(source, nullptr, true, true);

    assert(o3 == o2);
    std::cout << "\no3->\n" << o3.dump(2) << std::endl;
}
2. 基础方法
JSON 字段的简单类型包括:number、boolean、string 和 null(即空值);复杂类型则有 对象(Object)和数组(Array)两类。
2.1 节点与值
访问对象的指定名字的某个字段,可以使用 [“key”] ,访问指定下标的某个元素,可以使用 [ index ] 来访问(二者本质都是对 [] 操作符的重载),也可以通过方法 at(key/index) 来访问。
当指定名字(key)或下标(index)并无对应数据可供访问时,在 nlohmann/json 中,都被视为越界操作;此时,使用 [ ] 将“喜提”未定义(UB)的结果,而使用 at () 则得到异常。
通过 [] 或 at() 得到是 JSON 节点 (一个字段,或一个数组的一个元素);更多的时候,我们想要得到既定类型的值。
假设有这样一个 nlohmann/json 对象:
nlohmann::json o =
{
  { "id","ORD20250409-191" },
  { "customerID", 10345 },
  { "items", {123, 94320, 8} },
  { "totalAmount", 172.8 },
  { "orderDate","2025/04/09" }
};
存在隐式和显式两种取值方法,如下:
int id1 = o["customerID"];  // 隐式
int id2;
id2 = o["customerID"]; // 隐式

int id3 = o["customerID"].get<int>(); // 显式,适用定义新变量

int id4;
o["customerID"].get_to(id4); // 显式,类型信息来自已定义的 id4
这里的显式或隐式,指的类型转换过程:JSON 节点类型到目标类型的转换过程。隐式转换会在以下两点都满足时,出现问题(造成编译失败):
- 目标类型重载了赋值操作符(即: = );
- 转换时,目标对象是已定义变量(即:确实在为某个“老”对象赋值,而非在构造新对象)。
举个例子,假设已经有如下结构:
struct Item
{
    int a;

    // 该类型存在自定义的 = 操作符重载
    Item& operator = (int a) { this->a = a; return *this; }
};
并且你已经实现让 Item 和 nlohmann/json 可以互转,则,如下代码中的 it1 和 it2,一者OK,一者失败。
nlohmann::json j = R"(
{
   "item": { "a": 100 }
})";

Item it1 = j["item"]; // OK!
Item it2;

it2 = j["item"];  // 编译失败
推荐坚持使用 get<T>() 或 get_to<T> (…) 显式指定要转换的目标类型。严格的话,可以项目中定义全局宏:
JSON_USE_IMPLICIT_CONVERSIONS=0以禁用隐式取值,如是CMake项目,在CMakeList.txt 内添加代码:SET (JSON_ImplicitConversions OFF),可得相同效果。
2.2 迭代器
借助迭代器,有四种 for 循环可用以迭代 JSON 对象的内容(假设 o 为 某json对象):
- 循环1
for (auto it = o.begin(); it != o.end(); ++it)
{
    cout << it.key() << ":" << it.value() << "\n";
}
- 循环2
for (auto it : o.items()) // 本质同循环1
{
    cout << it.key() << ":" << it.value() << "\n";
}
- 循环3
for (auto v : o)  // 此时只有 value,因此比较适合遍历数组节点
{
   cout << v << "\n";
}
- 循环4
for (auto & [k, v] : o.items()) // 需 c++17 结构化绑定支持
{
   cout << k << ":" << v << "\n";
}
2.3 异常
nlohmann/json 日常操作中,有三种常见异常类型(它们的基类都是 nlohmann::json::exception)。
- json::parse_error / 解析出错
解析的数据中,存在格式(包括编码)非法的数据,典型如:包含了非 UNICODE 编码的汉字内容。nlohmann/json 支持的UNICODE编码具体包括:UTF-8、UTF-16、UTF-32等。
注:“注释”在 JSON 标准规范中,也是一种非常格式,但因为太常见,所以 nlohmann/json 提供了支持(非默认),详见视频一(快速认识)。
- json::out_of_range / 越界访问
使用 at(key/index) 访问数据时,查找无指定字段名或下标对应的数据时,即抛出该异常。
- json::type_error / 类型不匹配
典型如,对一个非对象、非数组类型的JSON节点,执行 push_back(新元素) 操作。
2.4 视频2:基础方法
2.5 示例项目-常用方法
- 报文 demo.json
{
    "name" : "丁小明",
    "age" : 12
}
- 代码
#include <cassert>

#include <iostream>
#include <fstream>
#include <string>
#include <vector>

#include <nlohmann/json.hpp>

using json = nlohmann::json;

int main()
{
    nlohmann::json o1 =
    {
        { "id","ORD20250409-191" },
        { "customerID", 10345 },
        { "items", {123, 94320, 8} },
        { "totalAmount", 172.8 },
        { "orderDate","2025/04/09" }
    };

    std::cout << o1["id"] << std::endl;
    std::cout << o1["customerID"] << std::endl;
    std::cout << o1["items"] << std::endl;
    std::cout << o1["totalAmount"] << std::endl;
    std::cout << o1["orderDate"] << std::endl;

    auto node = o1["id"];
    std::cout << "node type-name is :\n" << typeid(node).name() << std::endl;

    // 隐式转换类型,以获取值
    {
        std::string id1 = o1["id"];
        int customerID = o1["customerID"];
        std::cout << id1 << "," << customerID << std::endl;
    }

    // 显式转换类型,以获取值
    {
        auto id2 = o1["id"].get<std::string>();
        auto customerID2 = o1["customerID"].get<int>();
        std::cout << id2 << "," << customerID2 << std::endl;
    }

    {
        double totalAmount;
        o1["totalAmount"].get_to(totalAmount);
        std::cout << totalAmount << std::endl;
        std::cout << o1["totalAmount"].get_to(totalAmount) << std::endl;
    }

    // find、at
    {
        json o;
        o["name"] = "丁小明";
        o["age"] = 12;

        try
        {
            std::cout << o["Name"].get<std::string>() << " is "
                << o["age"].get<int>() <<std::endl;
        }
        catch(std::exception const& e)
        {
            std::cout << e.what() << std::endl;
        }

        auto it = o.find("Name1");
        if (it != o.end())
        {
            std::cout << it->get<std::string>() << std::endl;
        }
        else
        {
            std::cerr << "no found field : Name1." << std::endl;
        }

        try
        {
            std::cout << o.at("NAME").get<std::string>() << " is "
                << o["age"].get<int>() <<std::endl;
        }
        catch(std::exception const& e)
        {
            std::cout << e.what() << std::endl;
        }

        std::cout << o.dump(2) << std::endl;
    }

    // 迭代器、循环
    {
        for (auto const it : o1.items())
        {
            std::cout << it.key() << " ==> " << it.value()
                << "\ttype : " << it.value().type_name() << std::endl;
        }

        std::cout << "==================\n";

        for (auto [k, v] : o1.items())
        {
            std::cout << k << " ==> " << v
                << "\ttype : " << v.type_name() << std::endl;
        }

        o1["items"].push_back(999);
        std::cout << o1["items"] << std::endl;
    }

    // 异常: 非法JSON报文
    {
        std::string s = "\"Hello JSON!——第2学堂!\"";

        try
        {
            auto j = json::parse(s);
            std::cout << j.dump() << std::endl;
        }
        catch(json::parse_error const& e)
        {
            std::cerr << e.id << "->" << e.what() << std::endl;
        }
    }

    // 从文件读
    {
        // 请填写你的 demo.json 的实际位置
        std::ifstream ifs ("D:\\...\\CommonlyUsedJSON\\demo.json");

        if (!ifs)
        {
            std::cerr << "open file fail!" << std::endl;
            return -1;
        }

        try
        {
            std::cout << "== read from file : \n";
            auto j = json::parse(ifs);
            std::cout << j.dump(2) << std::endl;
        }
        catch(json::parse_error const& e)
        {
            std::cerr << e.what() << std::endl;
        }
    }

    // 异常:尝试和类型不匹配的行为
    {
        using namespace nlohmann::literals;

        json j = R"(
        {
            "id" : "Hello!",
            "items": [1, 2, 3]
        }
        )"_json;

        try
        {
            j.at("items").push_back(4);
            j.at("id").push_back('a');
        }
        catch(json::type_error const& e)
        {
            std::cerr << e.what() << std::endl;
        }
    }
}
3. 结构化转换
绝大多数情况下,程序和外部交换的数据,都是结构化的数据。

3.1 手工实现——必须掌握的基本功
在的业务类型的同一名字空间下,实现 from_json 和 to_json 两个自由函数(必要时,也可定义为类型的友元函数),即可实现该结构类型与 nlohmann/json 数据的双向转换。
示例:
namesapce d2::ec {
struct Order  // 订单
{
    string id;
    int customerID;

    vector<long> items;
    double totalAmount;

    string orderDate;
};

// json → Order
void from_json(json const& j, Order& o)
{
    j.at("id").get_to(o.id);
    j.at("customerID").get_to(o.customerID);
    j.at("items").get_to(o.totalAmount);
    j.at("totalAmount").get_to(o.totalAmount);
    j.at("orderDate").get_to(o.orderDate);
}

// Order → json
void to_json(json& j, Order const& o)
{
   j["id"] = o.id;
   j["customID"] = o.customerID;
   j["items"] = o.items; // 完美支持 STL 容器
   j["totalAmount"] = o.totalAmount;
   j["orderDate"] = o.orderDate;
}

} // namespace d2::ec
3.2 借助宏,快速定义
- NLOHMANN_DEFINE_TYPE_NON_INTRUSIVE // 非侵入式
- NLOHMANN_DEFINE_TYPE_INTRUSIVE // 侵入式
- NLOHMANN_DEFINE_TYPE_NON_INTRUSIVE_WITH_DEFAULT // 非侵入,且字段缺失时不报错
- NLOHMANN_DEFINE_TYPE_INTRUSIVE_WITH_DEFAULT // 侵入式,且字段缺失时不报错
- NLOHMANN_DEFINE_DERIVED_TYPE_NON_INTRUSIVE // 用于派生类,非侵入式
- NLOHMANN_DEFINE_DERIVED_TYPE_INTRUSIVE // 用于派生类,侵入式
- NLOHMANN_DEFINE_DERIVED_TYPE_NON_INTRUSIVE_WITH_DEFAULT //用于派生类,非侵入,字段缺失不报错
- NLOHMANN_DEFINE_DERIVED_TYPE_INTRUSIVE_WITH_DEFAULT //用于派生类,侵入,字段缺失不报错
- NLOHMANN_JSON_SERIALIZE_ENUM //专用于让枚举类型的值,以字符串方式进行 JSON 读写
3.3 视频3:结构转换
3.4 代码:我要打十个!
#include <iostream>
#include <string>
#include <vector>
#include <chrono> // 时间
#include <optional> // 可选值

#include <nlohmann/json.hpp>

using json = nlohmann::ordered_json;

namespace d2::ec // d2school 电商系统
{

// 第1个:订单状态
enum class OrderStatus // 订单状态
{
    pending, // 待支付
    paid, // 已支付
    shipped, // 已发货
    completed, // 已完成
    cancelled // 已取消
};

NLOHMANN_JSON_SERIALIZE_ENUM(OrderStatus, {
    {OrderStatus::pending, "pending"},
    {OrderStatus::paid, "paid"},
    {OrderStatus::shipped, "shipped"},
    {OrderStatus::completed, "completed"},
    {OrderStatus::cancelled, "cancelled"}
})


// 第2个:商品
struct Item
{
    size_t id; // 商品ID
    std::string name; // 商品名称
    double price; // 商品价格
    double discount = 1; // 商品折扣
};

NLOHMANN_DEFINE_TYPE_NON_INTRUSIVE_WITH_DEFAULT(Item, id, name, price, discount)

// 第3个:客户
struct Customer
{
    std::string id; // 客户ID
    std::string nick; // 客户名称
};

NLOHMANN_DEFINE_TYPE_NON_INTRUSIVE(Customer, id, nick)

// 第4个:是否允许周末送货
enum class WeekendDelivery // 是否允许周末送货
{
    pending, // 选定
    allowed, // 允许
    denied // 拒绝
};

NLOHMANN_JSON_SERIALIZE_ENUM(WeekendDelivery, {
    {WeekendDelivery::pending, "-"},
    {WeekendDelivery::allowed, "✓"},
    {WeekendDelivery::denied, "✗"}
})

// 第5个:收货地址
struct Address
{
    std::string name; // 收货人姓名
    std::string phone; // 收货人电话

    std::string provinice; // 省
    std::string city; // 市
    std::string street; // 街道
    std::string detail; // 详细地址

    std::string zip; // 邮政编码

    WeekendDelivery weekendDelivery = WeekendDelivery::pending; // 是否允许周末送货
};

NLOHMANN_DEFINE_TYPE_NON_INTRUSIVE_WITH_DEFAULT(Address, name, phone, provinice, city, street, detail, zip, weekendDelivery)

// 第6个:时间点
struct TimePoint : std::chrono::system_clock::time_point
{
    using BaseClass = std::chrono::system_clock::time_point;

    using BaseClass::BaseClass;  // 继承构造函数

    TimePoint (BaseClass const& tp)
        : BaseClass(tp)
    {}
};

void to_json(json& j, TimePoint const& tp)
{
    auto t = std::chrono::system_clock::to_time_t(static_cast<TimePoint::BaseClass>(tp));

    char mbstr[100];
    if (std::strftime(mbstr, sizeof(mbstr), "%Y-%m-%d %H:%M:%S", std::localtime(&t)))
    {
        j = mbstr; // 转换为字符串
    }
    else
    {
        j = nullptr; // 转换失败
    }
}

void from_json(json const& j, TimePoint& tp)
{
    std::string str = j.get<std::string>();
    std::tm tm = {};
    std::istringstream ss(str);
    ss >> std::get_time(&tm, "%Y-%m-%d %H:%M:%S");

    if (ss.fail())
    {
        throw std::runtime_error("Failed to parse time point");
    }

    std::time_t t = std::mktime(&tm);

    tp = TimePoint(std::chrono::system_clock::from_time_t(std::mktime(&tm)));
}

// 第7个:订单(概要信息)
struct Order // 订单
{
    std::string id; // 订单ID
    Customer customer; // 客户

    // 第8个:对 std::vector<> 的先天支持
    std::vector<Item> items; // 包含商品

    double totalAmount; // 订单总金额

    TimePoint orderTime; // 订单时间
    Address address; // 收货地址

    OrderStatus status = OrderStatus::pending; // 订单状态,默认待支付
};

NLOHMANN_DEFINE_TYPE_NON_INTRUSIVE_WITH_DEFAULT(Order, id, customer, items, totalAmount, orderTime, address, status)

// 第9个:订单详情(派生类)
class OrderDetail : private Order // 订单详情
{
public:
    OrderDetail(Order const& order)
        : Order(order) // 继承构造函数
    {
        if (status >= OrderStatus::paid)
        {
            UpdatePayTime(); // 更新支付时间
        }
    }

    void UpdateMemo(std::string_view m)
    {
        this->memo = m; // 更新备注
    }

    void UpdateStatus(OrderStatus newStatus)
    {
        if (this->status == newStatus)
        {
            return; // 状态未改变
        }

        if (newStatus == OrderStatus::pending)
        {
            this->payTime.reset(); // 重置支付时间(变成空)
        }
        else if (newStatus >= OrderStatus::paid)
        {
            if (!this->payTime) // 当前支付时间为空
            {
                UpdatePayTime(); // 更新支付时间
            }
        }

        this->status = newStatus; // 更新状态
    }

public:
    NLOHMANN_DEFINE_DERIVED_TYPE_INTRUSIVE_WITH_DEFAULT(OrderDetail, Order, memo, payTime)

private:
    // 更新支付时间
    void UpdatePayTime()
    {
        this->payTime = TimePoint(std::chrono::system_clock::now());
    }

    std::string memo; // 订单备注
    // 第10个:对 std::optional<> 的先天支持
    std::optional<TimePoint> payTime; // 支付时间
};

}; // namespace d2::ec

int main(int, char**)
{
    using namespace d2::ec;

    // 创建一个订单
    Order o1;
    o1.id = "O-123456"; // 订单ID
    o1.customer = {"C10026Aed", "南飞的大圣"}; // 客户

    o1.items =  // 商品
    {
        {1232, "iPhone 14 Pro", 9999.0, 0.8},
        {452, "MacBook Pro 16", 19999.0, 0.9},
        {30098, "iPad Pro", 7999.0}
    };

    o1.totalAmount = [&item = o1.items] () -> double
    {
        double total = 0.0;
        for (auto const& i : item)
        {
            total += i.price * i.discount;
        }

        return total;
    }();

    o1.orderTime = TimePoint(std::chrono::system_clock::now()); // 订单时间

    o1.address = {"孙悟空", "13800138000", "福建省", "厦门市", "沧海路", "天汇大厦908号", "3602001",
            WeekendDelivery::denied}; // 收货地址

    o1.status = OrderStatus::pending;

    // 序列化
    json j1 = o1; // 序列化为 JSON
    std::string jStr = j1.dump(4); // 转换为字符串
    std::cout << jStr << std::endl; // 打印 JSON

    // 反序列化
    json j2 = json::parse(jStr); // 解析 JSON
    Order o2 = j2.get<Order>(); // 反序列化为订单对象

    json j3 = o2; // 序列化为 JSON
    std::cout << j3.dump(2) << std::endl; // 打印 JSON

    std::cout << "\n=====================================\n";

    OrderDetail od1(o1); // 创建订单详情
    json j4 = od1; // 订单详情 -> JSON
    std::cout << j4.dump(2) << std::endl; // 打印 JSON

    std::cout << "\n------------------------------------------\n";
    od1.UpdateStatus(OrderStatus::paid); // 更新状态:已支付
    od1.UpdateMemo("「商家」:已付款,请尽快发货,走顺风"); // 更新备注

    json j5 = od1; // 订单详情 -> JSON
    std::cout << j5.dump(2) << std::endl; // 打印 JSON
}
4. 项目应用
本课为 fswatch(第一“杰”)的示例项目加上对配置文件读取的支持,同时借助 第三“杰” CLI11 的支持,完美实现命令行参数与配置文件的逻辑统一。
4.1 视频4:项目应用
4.2 项目代码
项目基于原有的 CMake 项目 HelloFSWatch 修改。
-
CMakeLists.txt
该文件基于原项目,没有任何改动。 -
.vscode/setting.json
{
    "cmake.debugConfig": {
        "cwd": "${workspaceFolder}",
        "args": ["-m", "3", "--log-level", "info"],
        "externalConsole": false
    }
}
重点:① args字段:添加命令行参数;② cwd 字段:设置程序在项目根目录下运行(而在程序所在的 build 子目录内)。
- myConfig.json
{
    "paths": [ "c:\\tmp", "c:/tmp/aaa" , "d:/tmp" ],

    "maxOutput": -1,
    "createdOnly" : false,

    "destination": "d:\\我的学习资料",

    "toBase64": [".png", ".jpg", ".jpeg"],
    "toSnappy": [".txt", ".pdf"],

    "logFile": ".\\log\\log.txt",
    "logLevel": "off"
 }
- main.cpp
#include <ctime>

#include <iostream>
#include <iomanip>
#include <memory> // 智能指针 shared_ptr<>

#include <libfswatch/c++/monitor_factory.hpp>
#include <CLI/CLI.hpp>

#include <nlohmann/json.hpp>

#include "myiconv.hpp"

using json = nlohmann::json;

namespace Watch::settings
{
//----------------------------------------------

// 日志级别(暂使用手工定义,007杰讲改用三方库中的定义)
enum class LogLevel
{
    // 跟踪、调试、信息、警告、错误 、危急、关闭
    trace, debug, info, warn, err, critical, off
};

// 让枚举 LogLevel 支持与JSON双向转换
NLOHMANN_JSON_SERIALIZE_ENUM(LogLevel,
{
    {LogLevel::trace, "trace"},
    {LogLevel::debug, "debug"},
    {LogLevel::info, "info"},
    {LogLevel::warn, "warn"},
    {LogLevel::err, "err"},
    {LogLevel::critical, "critical"},
    {LogLevel::off, "off"}
})

// 配置数据的结构体
struct Config
{
    std::vector<std::string> paths;
    int maxOutput = -1;
    bool createdOnly = false;

    std::string destination;
    std::vector<std::string> toBase64;
    std::vector<std::string> toSnappy;
    std::string logFile = "./log.txt";
    LogLevel logLevel = LogLevel::off;
};

NLOHMANN_DEFINE_TYPE_NON_INTRUSIVE_WITH_DEFAULT(Config,
    paths, maxOutput, createdOnly,
    destination, toBase64, toSnappy,
    logFile, logLevel)

std::string getLogLevelName(LogLevel ll)
{
    json j = ll;
    return j.get<std::string>();
}

std::map<std::string, LogLevel> logLevelNameMap
{
    {getLogLevelName(LogLevel::trace), LogLevel::trace},

    #define llNameItem(ll) {getLogLevelName(LogLevel::ll), LogLevel::ll}

    llNameItem(debug),
    llNameItem(info),
    llNameItem(warn),
    llNameItem(err),
    llNameItem(critical),
    llNameItem(off)

    #undef llNameItem
};

// 配置数据“格式器”
class MyCLIConfigAdaptor : public CLI::Config
{
public:
    // 如何从 JSON 数据读出 各个配置项
    std::vector<CLI::ConfigItem> from_config (std::istream &input) const override;

    // 如何从app,生成配置文件内容(字符串)
    std::string to_config (CLI::App const* app,
        bool default_also, bool write_description, std::string prefix) const override
    { return ""; }
};

std::vector<CLI::ConfigItem> MyCLIConfigAdaptor::from_config (std::istream &input) const
{
    try
    {
        json j = json::parse(input, nullptr, true /*允许异常*/, true /*允许注释*/);

        auto cfg = j.get<settings::Config>();

        auto items = std::vector<CLI::ConfigItem>
        {
            {{}, "paths", cfg.paths },
            {{}, "max-ouput", { std::to_string(cfg.maxOutput) }}, // 视频中误为 "max-count"
            {{}, "created-only", { cfg.createdOnly? "true" : "false"} },
            {{}, "destination", { cfg.destination }},
            {{}, "to-base64", cfg.toBase64},
            {{}, "to-snappy", cfg.toSnappy},
            {{}, "log-file", {cfg.logFile}},
            {{}, "log-level", {std::to_string(static_cast<int>(cfg.logLevel))}}
        };

        return items;
    }
    catch(json::exception const& e)
    {
        std::cerr << "JSON 配置数据有误。" << e.what() << std::endl;
    }
    catch(std::exception const& e)
    {
        std::cerr << "读取并转换配置数据发生异常。" << e.what() << std::endl;
    }

    return {};
}

//----------------------------------------------
} // namespace Watch::settings

Watch::settings::Config theConfig; // 全局唯一的配置

// 返回值:必须是 void,入参必须是 std::vector<fsw::event> const & 和 void *
void on_file_changed(std::vector<fsw::event> const & events, void *)
{
    /* 略,保持原有实现不变;本课,配置数据尚未发挥作用 */
}

int main(int argc, char** argv) // 主函数
{
    // 一、定义一个CLI::App 的变量
    CLI::App app("HelloFSWatch");

    // 1.1 指定(默认的)配置文件
    app.set_config("--config", "./myConfig.json", "指定配置文件");

    // 1.2 创建并指定定制的配置数据格式解析器
    app.config_formatter(std::make_shared<Watch::settings::MyCLIConfigAdaptor>());

    // 二、添加命令行参数
    try
    {
        app.add_option("paths", theConfig.paths, "待监控的文件夹路径(可含多个)")->required();
        app.add_option("--max-output,-m",
               theConfig.maxOutput, "启动后输出事件个数")->default_val(-1);
        app.add_flag("-c,--created-only", theConfig.createdOnly, "只关注新建信息");
        app.add_option("--destination,-d",
               theConfig.destination, "输出文件路径")->required();
        app.add_option("--to-base64", theConfig.toBase64, "需要转成base64的文件的扩展名(数组)");
        app.add_option("--to-snappy", theConfig.toSnappy, "需要转成snappy的文件的扩展名(数组)");
        app.add_option("--log-file",
             theConfig.logFile, "日志文件路径")->default_val("./log.txt");
        app.add_option("--log-level",
             theConfig.logLevel, "可输出的最小日志级别")
               ->default_val(Watch::settings::LogLevel::off)
               ->transform(CLI::CheckedTransformer(Watch::settings::logLevelNameMap));

        // 三、开始解析命令行
        app.parse(argc, argv);
    }
    catch(std::exception const& e)
    {
        std::cerr << e.what() << std::endl;
        return -1;
    }

    // 显示当前生效的配置数据
    json j = theConfig;
    std::cout << "\n当前发挥作用的配置是:\n" << j.dump(2) << std::endl;

    auto *monitor = fsw::monitor_factory::create_monitor(
        system_default_monitor_type,
        theConfig.paths,
        on_file_changed
    );

    // 启动监控
    monitor->start();  // 进入死循环
}
5 扩展学习
5.1 不与命令行结合
事实上,至少有四个原因,让更多项目选择了命令行是命令,配置文件是配置文件。
- 不少项目中,命令行参数和配件文件分工非常明确,可谓井水不犯河水;
- 哪怕命令行参数和配置文件有关系,通常也不复杂,手工处理毫无难处;
- 像CLI11这样支持主动和配置文件建立关系统一处理的命令行库,少见;
- 像CLI11这样处理的,也有缺点:需要很谨慎的处理二者的一致性(比如像视频那样,一不小心名字写错一个,就是引入一个BUG)。
下面是第四小节 “项目应用” 视频中提到的,只需一页PPT的例子:
// 配置数据
struct Config
{
    vector<string> paths;
    int maxOutput = -1;
    bool createdOnly = false;

    string destination;
};

// 让它支持和JSON互换
NLOHMANN_DEFINE_TYPE_NON_INTRUSIVE_WITH_DEFAULT (
       Config,
       paths, maxOutput, createdOnly, destination)


// 从指定文件中读出
bool LoadConfig (Config& c,
               std::string filename)
{
    std::ifstream ifs(filename);
    if (!ifs)
       return false;

    nlohmann::json j;
    j = json::parse(ifs, nullptr, true, true); //支持注释

    j.get_to(c); // json->Config
    return true;
}

// 写入到指定文件
bool SaveConfig (Config const& c,
          std::string filename)
{
    std::ofstream ofs(filename);
    if (!ofs)
        return false;

    nlohmann::json j = c; //config->json

    ofs << j.dump(2);
    return true;
}
5.2 to_config 的实现
上述代码中,MyCLIConfigAdaptor 类的 to_config() 函数没有真正实现(直接返回空字符串),原因有三:
- 如视频所说,不建议项目自行输出自身的设置数据;
- 哪怕真要输出,也可以(甚至是建议)使用 5.1 小节的 SaveConfig() 方法,将配置数据借助 nlohmann/json 直接写入文件,不用非要先经 CLI11,再经 nlohmann/json。
- 如果你使用 TOML (或INI)作为配置文件的格式,则CLI11有良好的支持,基本也不用我们再自定义 to_config()。
说千道万,如果就是想通过 CLI11 去调用 nolhmann/json 去处理输出配置数据,怎么办?这时有两种方法可选:
- 写一个通用于所有 JSON 配置的, CLI::Config 的派生类;
- 只为特定某个项目的配置提供支持。
强烈建议选择2,因为方法1听起来,就应该是 CLI11 作者该去做的事……
下面是 fswatch 示例项目中,针对 settings::Config 结构所写的 MyCLIConfigAdaptor 类中, to_config() 的实现。
//  除 app 外,其它参数的说明
// default_also: 为真时,表示要将原本配置文件中不存在的,使用默认值的配置项,也写到配置结果数据中;
// write_description 要求把参数的说明也写到配置结果数据中(通常是注释);
// prefix:要求配置项加上统一前缀
// 三者通常都被直接无视
std::string CLIConfigAdaptor::to_config (CLI::App const* app,
         bool /*default_also*/, bool /*write_description*/, std::string /*prefix*/) const
{
    json j;
    try
    {
        for (auto opt = app->get_options())
        {
            auto name = opt->get_name();

            if (name == "paths") // 位置参数,没有 -- 前缀
            {
                j["paths"] = opt->as<std::vector<std::string>>();
            }
            else if (name == "--created-only")
            {
                j["createdOnly"] = opt->as<bool>();
            }
            else if (name == "--max-output")
            {
                j["maxOutput"] = opt->as<int>();
            }
            else if (name == "--destination")
            {
                j["destination"] = opt->as<std::string>();
            }
            else if (name == "--to-base64")
            {
                j["toBase64"] = opt->as<std::vector<std::string>>();
            }
            else if (name == "--to-snappy")
            {
                j["toSnappy"] = opt->as<std::vector<std::string>>();
            }
            else if (name == "--log-file")
            {
                j["logFile"] = opt->as<std::string>();
            }
            else if (name == "--log-level")
            {
                j["logLevel"] = opt->as<LogLevel>();
            }
        }

        return j.dump(2);
    }
    catch(std::exception const& e)
    {
        std::cerr << e.what() << std::endl;
        return "";
    }
}
to_config() 返回结果是 std::string,和文件或其它输出流并无关系。上层调用时,CLI11所提供的“输出”相关的方法,仍然是“输出”字符串。从该方法的名字即可见一斑: config_to_str(),使用方法为:app.config_to_str(),比如:
auto configData = app.config_to_str();
std::ofstream ofs("./myConfig.json");
ofs << configData;
ofs.close();
嗯?使用 JSON 输出,不也是一行 ofs << j.dump(2) 的事?